If you are new to owning a Silhouette CAMEO knowing these tips can help you avoid common pitfalls and get up and running with your machine super quickly!
 Even though I have had my Silhouette for years now, I can still remember the day I took it out of the box and of course needed a project done ASAP even though I hadn’t the slightest clue how to use it! There are a few tips and tricks that once you are experienced you don’t give a second thought, but when you are new they can trip you up if you don’t know them. I have been thinking through it, jotting notes, asking friends some time, and finally put together a list of the top tips I think will be really helpful if you are making your first cuts with the machine or still feel a little uncertain using it.
But first, let me make sure you know about my Silhouette 101 series! I have been putting together all of the how-tos and tutorials for my most asked questions, and favorite tips and tricks I have learned along the way in this series! You can see all of the posts and a list of Free Silhouette Cut Files here on the Silhouette 101 page. Now before we start, make sure to do two important things:
- Sign up for my Crafty Newsletter! This will deliver all crafting posts including each new Silhouette 101 tutorial right to your inbox as they are released, so you don’t miss a thing! CLICK HERE to sign up!!
- Pin the Silhouette 101 page to your Silhouette or craft board on Pinterest (and make sure to follow me while you are there!) Now, if you are crafting and have questions, you have an easy place to find this post and a place to reference for all of your questions! CLICK HERE —> to pin Silhouette 101!
I am really hoping this series will help you go from newbie to pro in no time! Please make sure and let me know in the comments if there are other things tripping you up or a tip that really helped you! It makes my day to hear from you, and I love to update my posts with your tips! Now, on to the 13 things you ABSOLUTELY NEED TO KNOW!!
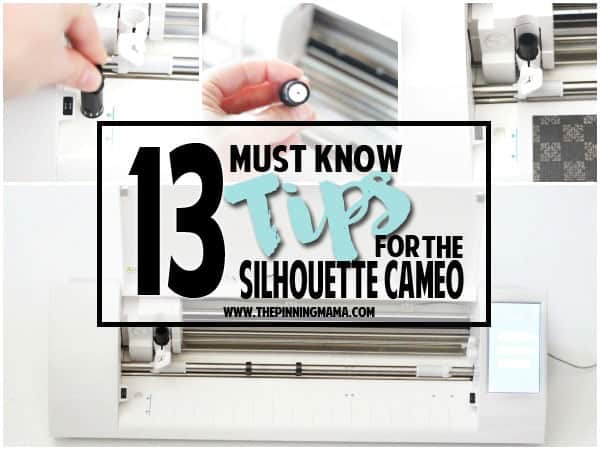
Tips for New Silhouette CAMEO Users
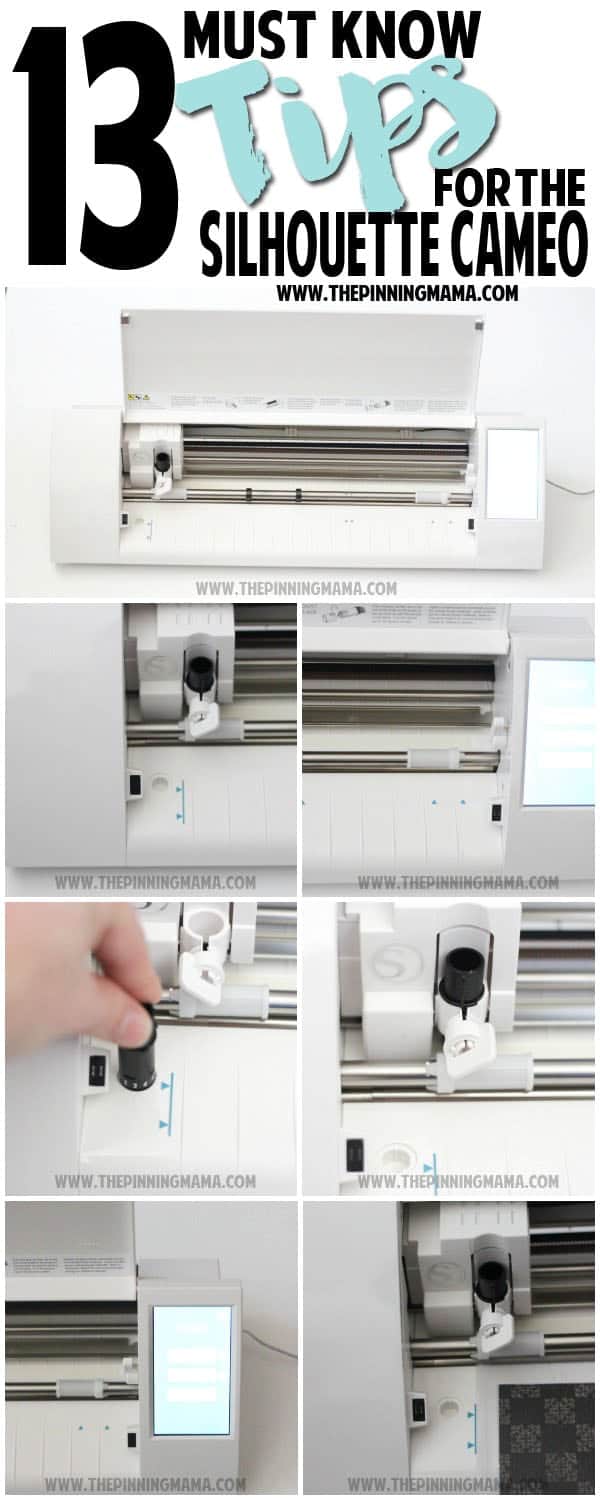
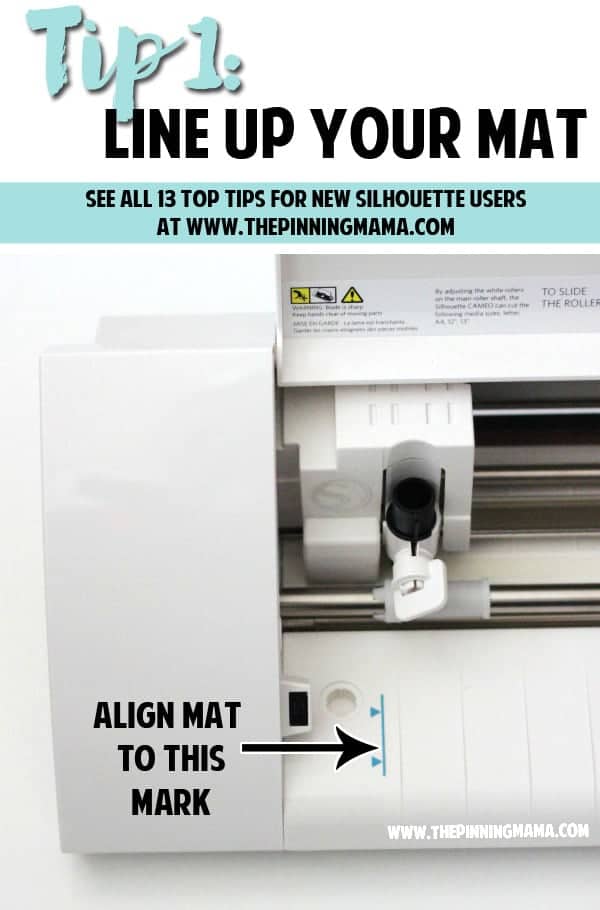
- Line up your media with the line on the side– With the Silhouette CAMEO this line was the same color as the machine, but on the CAMEO 2 it is now highlighted in red. If you open the lid of the machine and look to the left side you will see a pronounced blue line there – See pic below. This line is where you should line up the left side of your media or mat to load so that it cuts in the correct place.

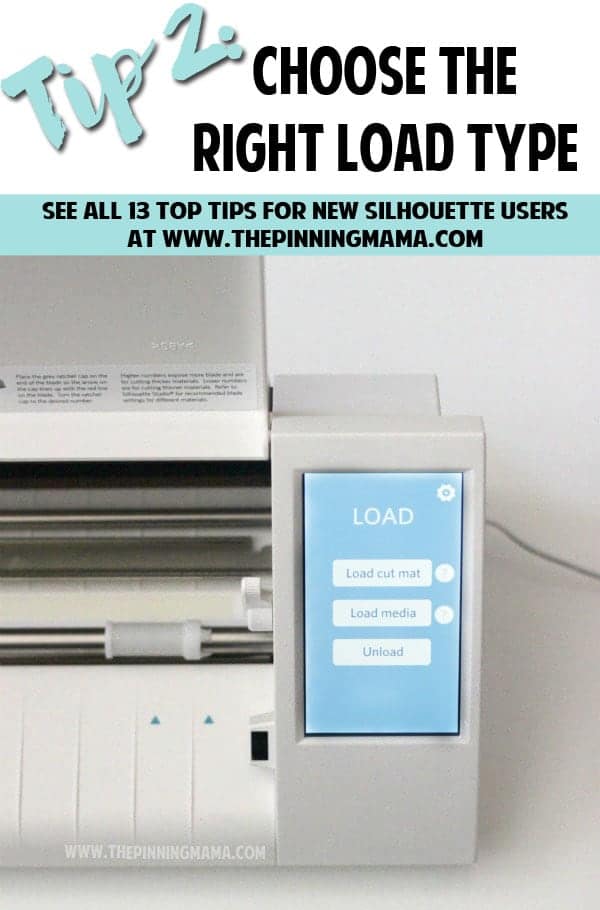
- Load media/mat– This is probably the NUMBER ONE common error with newbies, and one I remember driving me absolutely CRAZY the first time I used my machine. The good news is that once you know it, you almost never make the mistake again!
When you load your media, you need to choose the corresponding setting for what you are loading. This will be LOAD MAT if you are cutting media on a mat or if you are cutting without a mat, which you can do for vinyl, heat transfer and other materials that have their own backing, you will need to choose LOAD MEDIA.
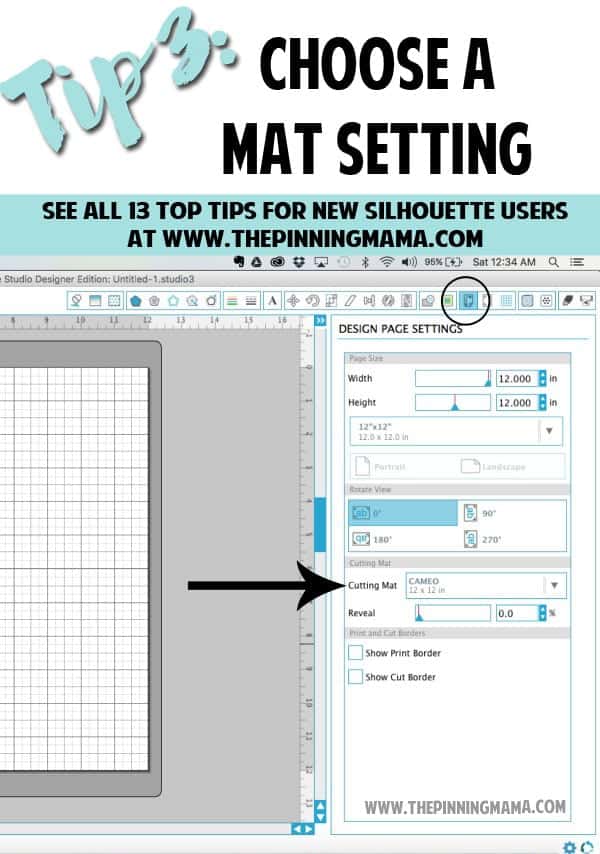
If you find that the alignment of where your Silhouette is cutting is high or low, this is probably the culprit. For example, if the machine is cutting too high up on your project or starts to cut into your mat above the media, it is probably because you chose load media, not load mat. - Mat/no mat setting for cutting- In addition to how you choose to load your media as we discussed above, you will need to tell the software if you are going to be using a mat or not when you cut. You will find this option on the DESIGN PAGE SETTINGS window in the cutting mat section. You can choose CAMEO, Portrait, or none according to how you will be cutting.

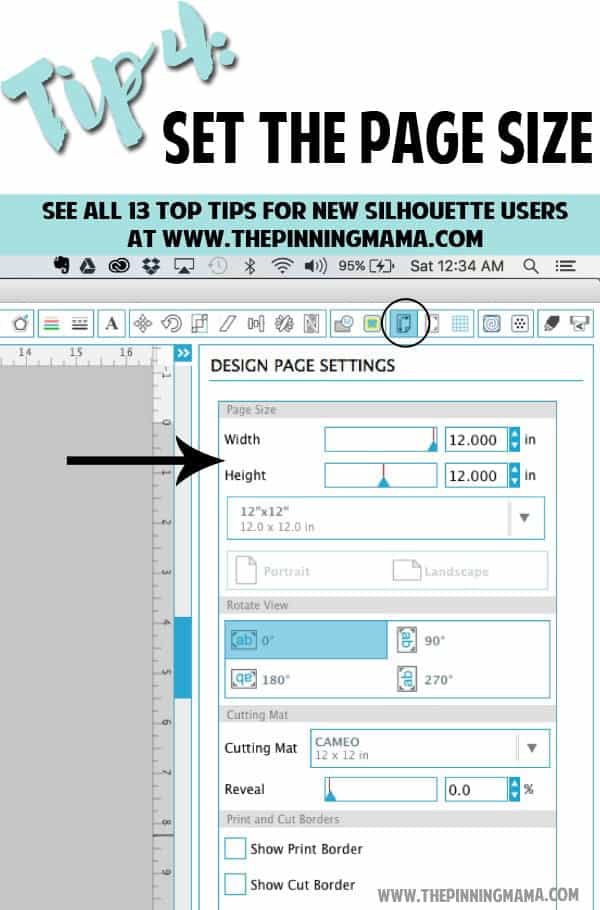
- Set the correct page size– You will want to make sure you set the page size for the media you are using. This is important whether or not you are using a mat and will be reflected in the design software so you can make sure your machine will cut where your paper is positioned on the mat. To change the page size open the DESIGN PAGE SETTINGS window, then change the width and height of the page size to what you are working with.
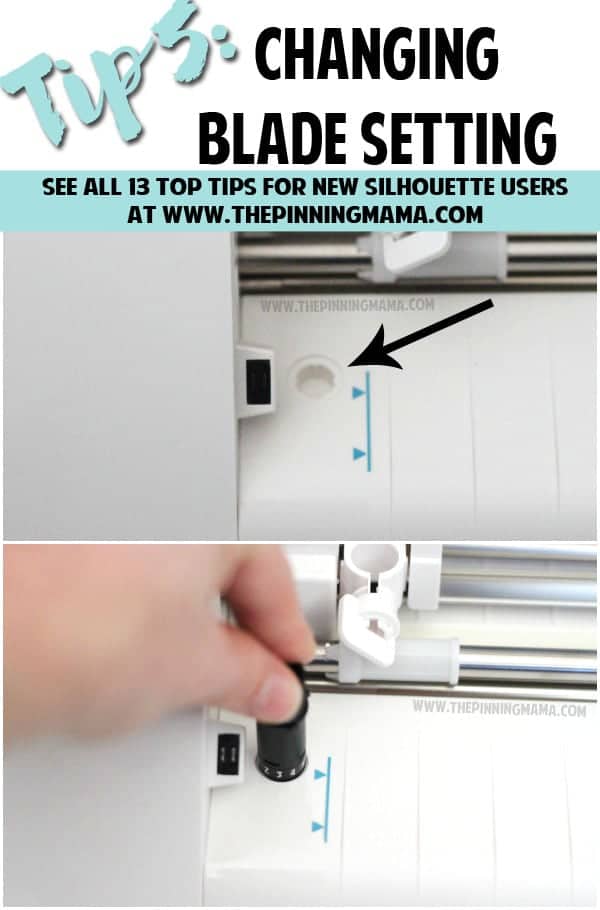
- Blade Ratchet to Change Blade Setting– On each machine made in the last 3 years or so there is a round indentation on the machine in the lower left- hand side. This is a tool you can use to change the setting on the blade. Just remove the blade from the carriage, put it blade side down into the indention and turn until the blade is on the setting you want. This is super handy so you don’t have to keep up with the little piece that they send with the blade. I just toss the small piece and use the built in ratchet on my machine.
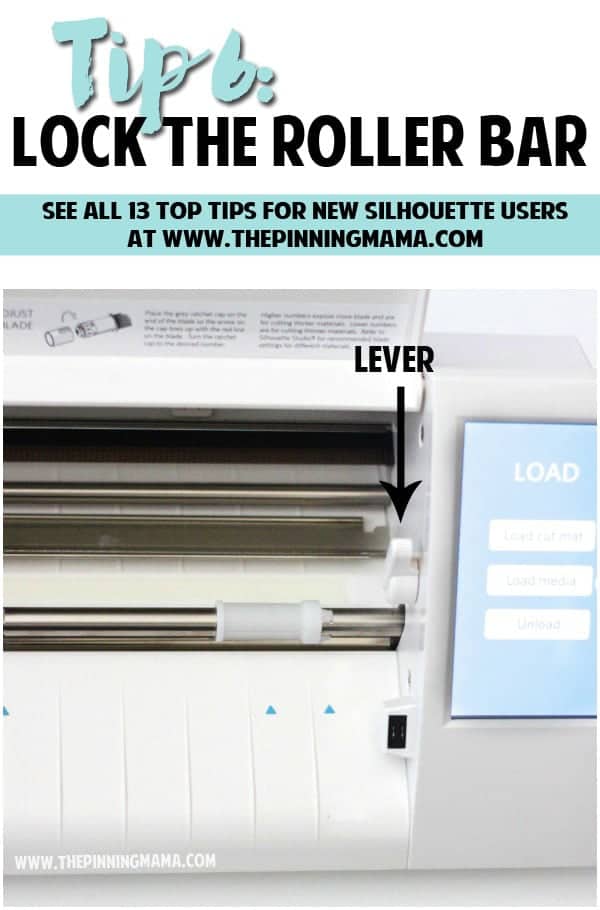
- Raise & Lower bar- Occasionally you will need to raise or lower the bar the rollers are on either to reposition them (see explanation in number 5 below) or to remove media that might have gotten stuck. Each time you cut you will need to make sure this bar is lowered and secured in place. You do this by raising and lowering the lever on the right hand side of the machine above the bar. On the Silhouette CAMEO 2, when the lever is raised the bar is locked down and to raise the bar you push the lever down.
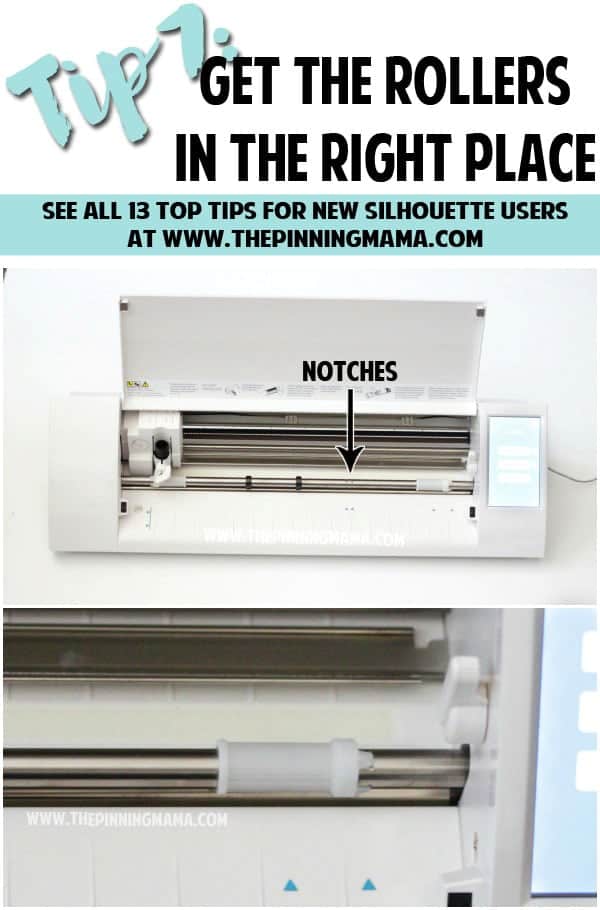
- Get the rollers in the right place – In order for the machine to hold your media tight and get a nice even cut the rollers need to be aligned correctly. The left roller will stay in place, but the right roller can be repositioned into any of the places on the bar where you see notches. You will want to make sure that the rollers are in the best place for the media you are loading if you are loading a 12×12 mat or piece of vinyl, you will want the rollers all the way out, which is how it comes by default. However, if you are loading a piece of vinyl or heat transfer material that is say 9 inches wide, you will need to move the roller in toward the middle so that the right rollers are going to be on the media as it loads and moves through the machine. To move the rollers, use the lever to raise the bar then turn the roller until it pops out of the notches it is in, and move it into the new notches you want to position it in. Lower the bar back down using the lever.
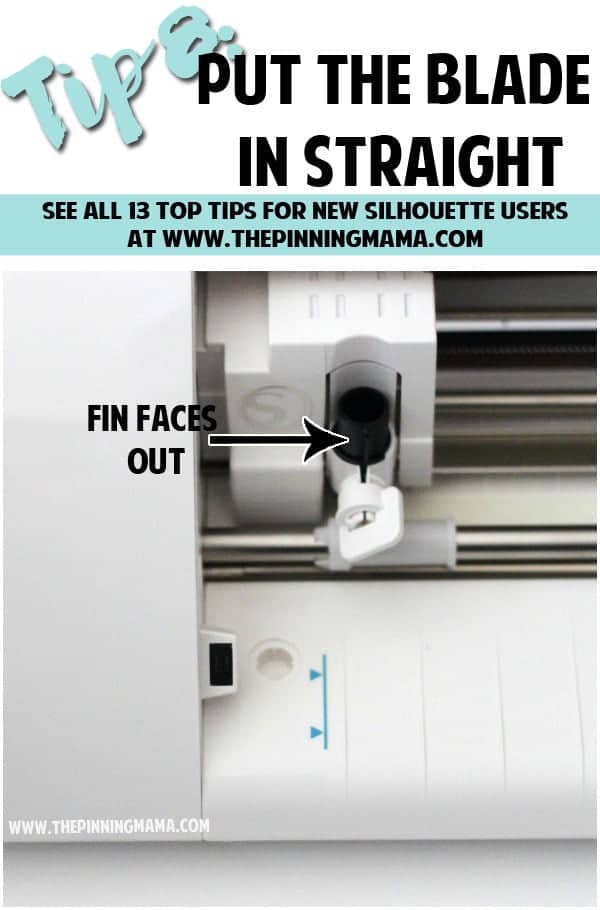
- Put blade in straight– There is a “right” way to put in the blade and according to Silhouette tech gurus you should always have the fin on the blade pointing directly outward (toward you.) If you have issues cutting and call or email the helpline, this will be one of the first questions they ask you, so it is good to keep in mind and make sure you have it in it’s optimum position.
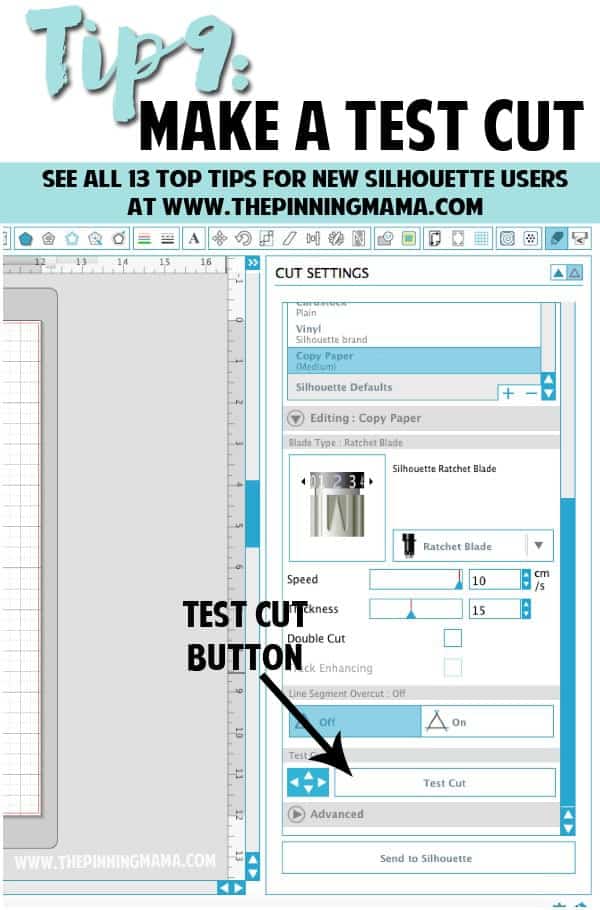
- Make a test cut- If you do on thing on this list make it this! Making a test cut will save you time, energy, frustration, not to mention lots of money on not wasting your material! Always do a small test cut to make sure the settings you have will cut the media perfectly to avoid ruining a whole sheet. When you do a test cut the machine will cut a small square with a triangle inside. By doing this you make sure it cuts all the way through your media (ie deep enough,) it doesn’t cut too deep where it will damage your mat or cutting strip, and if you are cutting something that has a backing like HTV, vinyl, or sticker paper you can cut through the top layer but not the backing perfectly. In previous versions of the software the test cut button was much more prevalent but now it is a little harder to find but still every bit the life saver it has always been!
- On your cut settings window, choose the media you want to cut.
- Scroll down under the window with the media options and it should say Editing: Copy Paper (or whatever media you chose.)
- You will be able to change the settings of your blade and the last option before the advanced menu will be test cut. Push this button to get a small cut with the chosen settings.
- Check the cut and adapt the settings as needed.
- Your mat will probably be too sticky– This is one of the most common complaints I hear with people making their first cuts. If you are using a new mat then many times the adhesive is so strong that it can be very hard to get paper or even paper backed vinyl or other media off of the mat without bending, ripping or tearing it. Many people recommend “destickying” your mat before the first use by sticking a tshirt or cloth to it a few times. I personally didn’t have this problem, but I think it was because my first cut was some pretty heavy duty cardstock. If you are using a material that is plastic or heavy duty then you probably don’t need to worry, but do keep this in mind so you don’t lose your mind if you can’t get your project off! Another great solution is the Silhouette light hold cutting mat
 which is really amazing and I highly recommend especially if you will be working with paper.
 - Make sure the media is adhered to the mat firmly– 8 times out of 10, if my media, snags, tears, or gets stuck in the blade it is because I didn’t take the time to make sure my media was secured all over to my mat. With newer mats this isn’t usually an issue, but with older mats, you need to take an extra minute to make sure that it was adhered to the mat evenly everywhere, not just in the middle. Use your palm, or even better, the Silhouette scraper tool to press the media to the mat and check that is is stuck evenly throughout.
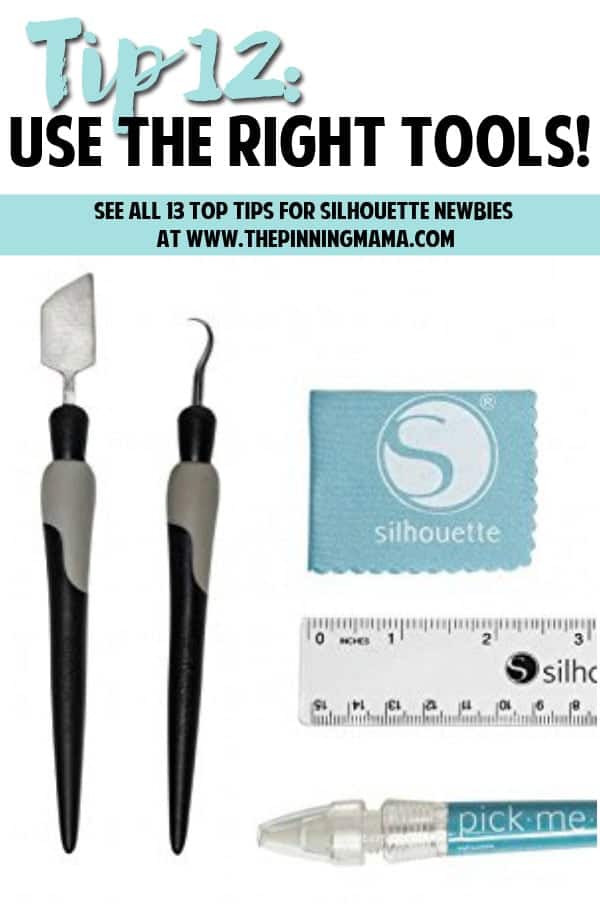
- Use the right tools- I didn’t have any tools when I first got my machine, which let to me inventing several creative hacks that I used in place of the proper tools (You can see my Silhouette Hacks here) I didn’t want to waste money on things I didn’t need, however, there are a few tools that really do come in handy and save you time and headache when making projects with your machine. My top three picks I think are always a good idea are: the Silhouette Hook, the Silhouette Spatula tool, and the Silhouette scraper. Each tool can usually be found for $3-$5 or less on Amazon, and they really do help you keep your projects in the best shape as you weed them and remove them from the mat so you will be glad you have them. Also, if you plan on using your machine to sketch, the Silhouette pen holder is great and highly recommended so that you can use almost any type of pen or marker rather than just the Silhouette pens. If you plan to get it all you can save a few bucks by getting the Silhouette Tool kit.
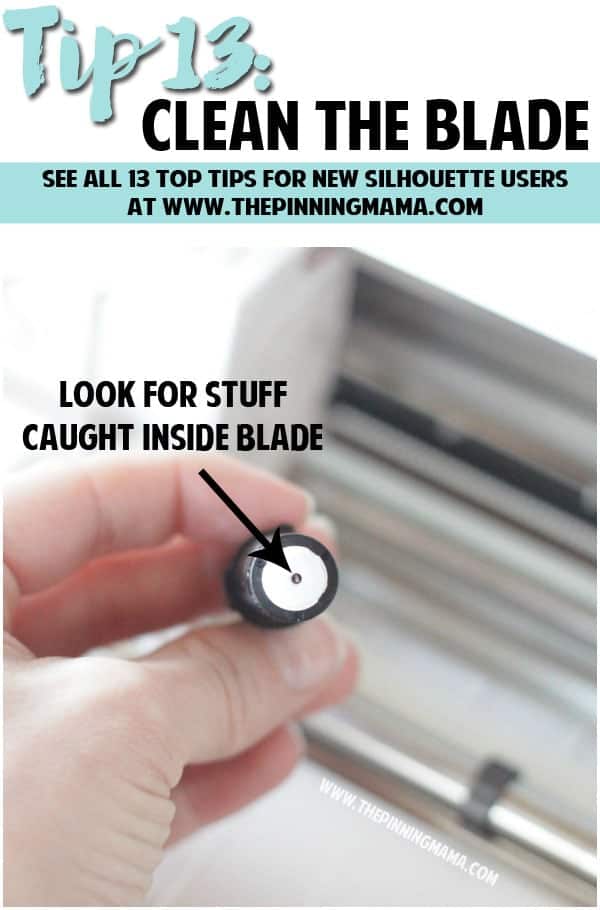
- Clean your blade- If your blade was cutting fine and all of a sudden isn’t cutting or is snagging the paper or causing other problems, your blade could have debris stuck in it. To check take the blade out of the carriage then look inside the end to see if you can see anything that is caught. You can use a straight pin to get bits of paper or vinyl out or if you can’t get it loose, you can use a wrench to get a good tight grip on the white plastic end part of the blade and twist it off to remove. Clean the blade and then screw it back on tightly.
 which is really amazing and I highly recommend especially if you will be working with paper.
 to press the media to the mat and check that is is stuck evenly throughout.
 ,
,  , and the
  . Each tool can usually be found for $3-$5 or less on Amazon, and they really do help you keep your projects in the best shape as you weed them and remove them from the mat so you will be glad you have them. Also, if you plan on using your machine to sketch, the
  is great and highly recommended so that you can use almost any type of pen or marker rather than just the Silhouette pens. If you plan to get it all you can save a few bucks by getting the
  .
.
BONUS:
Although you don’t NEED this tip, it is extra fun and one of my favorites so I had to share! You can create designs in Silhouette Studio to cut with your CAMEO with any font installed on your computer. Once you realize the amazing amount of different font styles out there, you will be overwhelmed the the ideas and possibilities for creating! One of the most fun things to do is pick some fun new fonts and start designing! You can see the best places to find FREE & CHEAP fonts here and how to add fonts to your Silhouette CAMEO here.

These 13 things will get you through the majority of the pitfalls new Silhouette user’s experience! You are officially on your way to becoming a pro. Leave me a comment below letting me know which was your favorite, or if you got stuck somewhere I didn’t mention.
If you thought this post was helpful I would love for you to pin this post on Pinterest to your Silhouette board! It helps you keep it for reference and helps me spread the word about my site! Another one of my most popular posts is 50+ Silhouette CAMEO Hacks. Check it out for tips & tricks beginner to advanced for doing anything with your Silhouette CAMEO!
Make sure to stay tuned for my next post which is a very detailed post on making your first cut. You can also find some great inspiration and tutorials by following my Silhouette CAMEO Pinterest board!


Gail cartmell says
Thanks for your tips from a beginner
Kimber says
So glad I could help Gail!! Let me know if you have other questions along the way!
Stephanie says
Hello! I am struggling with the cutting! I finally figured out the text but it is cutting too deep and it is on the first setting! Help please!
Julie says
try lessening the force. also the blade depth and speed can all help
Ashlee Crumpton says
I a,m struggling with this same issue. I am backing down on force and speed and its still cutting completely through my HTV vinyl. It makes it so difficult trying to do shirts letter by letter rather than weeding all in one piece. I have tried several different vinyl brands so I am sure thats not the issue. thanks in advance for your help and advice.
Kim says
I was glad to read this, I have a silhouette that is still in the box. I have taken it out a couple of times and was never able to make anything. Every time I tried, I ruined materials. I have hated my silhouette since the day I purchased it! I will try again now, using these tips and see if I get a different result.
Kimber says
So glad to hear this encouraged you Kim! I know it can be really intimidating to start but hopefully this will help get you over the biggest stumbling blocks. I have another HUGE post I am currently writing that goes through the exact steps you need to do step by step with very basic and clear instructions. It should post in the next few weeks so keep your eye out for that one too! It sounds like something that might be really helpful to you!Let me know how it goes and post any more questions or stumbling blocks you might have here so I can make sure to address it to help everyone who finds this post to be more helpful!
Kim says
i actually got my machine back out and after using your tips and making some adjustments, i was able to cut a few things. Amazing….i still cant get anything intricate cut but i can cut outlines of designs….great first start..
Tammy Conley says
AWESOME JOB!!!! Thank you for taking the time to do this. You have really set my mind to ease. I love this site!!! Tammy
Jennifer Whitcomb says
Thank you so much for taking the time to post this information! I was having a terrible time getting my machine to line up and cut correctly. I have ruined my new mat by cutting the top edge, but live and learn. Now I know how to properly line up my mat/medium so that the machine will cut what I want where I want it…. and I didn’t know before that I could and needed to set what I was loading. Selecting LOAD MAT or LOAD MEDIA is going to be huge for me. No wonder things were not always cutting right!! Thanks again and I will look on your boards and this site for other useful tips!
Marien says
Thank you, thank you and thank you. My husband bought me the Cameo and I was so happy, but when I opened it, I didn’t know what to do,,,,,,until I found your web.
Kimber says
SO glad to help! I have lots of beginner stuff so make sure and stay tuned!!
Tess says
how do i remove the cut lines from around the writing as i would like to print and cut out outer shape i.e a cloud shape with writing in it
Stephanie says
Love these tips! I have had my Cameo for 2 years and these came in handy. Thank you.
I was trying to address envelopes for a baby shower with my Cameo but couldn’t figure out how to print with the pens without the double lines. If you download any kind of ‘script fonts’ to the Cameo you will be double line free! Enjoy!
Cindy S. says
Thank you so much for your fantastic tips!! It has been the best one I have read yet. I love the pictures that show exactly where everything is located. Thank you so much!!
Kimber says
You are so welcome! Glad it helped!
Joan M says
Read several of your tutorials and made my first cut today. I didn’t want to purchase any fonts yet so I used one from the list in Sil Studio. I used cardstock. It stuck like crazy. Was hoping I could use the same piece and try printing in different areas, but it’s so rolled up I don’t think I can. I bought this to make stencils from plastic. Hopefully you have tutorials on that. Wondering if a design will be easier than text. Thanks so much.