Wow we’ve done it….. we’ve made our way through the Modify Panel. This week our lesson is all about reviewing all we’ve learned about the Modify panel. Silhouette Boot Camp is all about learning the terminology used in the Silhouette Studio software version 4 so that we can cut any design we can dream up with ease!
In Lesson 9, we learned all about our last feature in the Modify panel the Weld feature. The weld tool is something that almost everyone who uses the Silhouette CAMEO will use at some point.
Before we get started, there are a couple of things to help you get the most of the experience:
- If you are new here, take a look the Silhouette Boot Camp Welcome with all courses listed and catch up on any you missed.
- Sign up for my Silhouette Newsletter which will email you when the lessons are released each week.
- Pin this post! Each of these lessons takes me on average, 8-12 hours to create for you. I can do these lessons for FREE thanks to your support in coming to my site. By pinning this post or sharing it on Facebook with your Silhouette friends, it helps me spread the word so that I can keep the resources and freebies FREE to you!
Today’s lesson is reviewing the Silhouette Studio Modify Panel. We will go over all of the features of the Modify panel. The features in this panel are the Crop Tool, the Divide Tool, the Intersect Tool, the Subtract Tool, the Subtract All Tool, and the Weld Feature.
How do I use the Tools in the Modify Panel?
How do I use the Crop Tool in Silhouette Studio?
- Open up up two or more shapes.
- Place the shapes on top of each other
- Move the shape which you want to create the border of the design on top (right click –> bring to front)
- Select both designs by clicking one, then holding shift and clicking the other (you will know they are selected if they have a light box around the shape)
- Open the Modify window in the right tool bar and then click Crop in the menu options.
Example of the Crop Tool
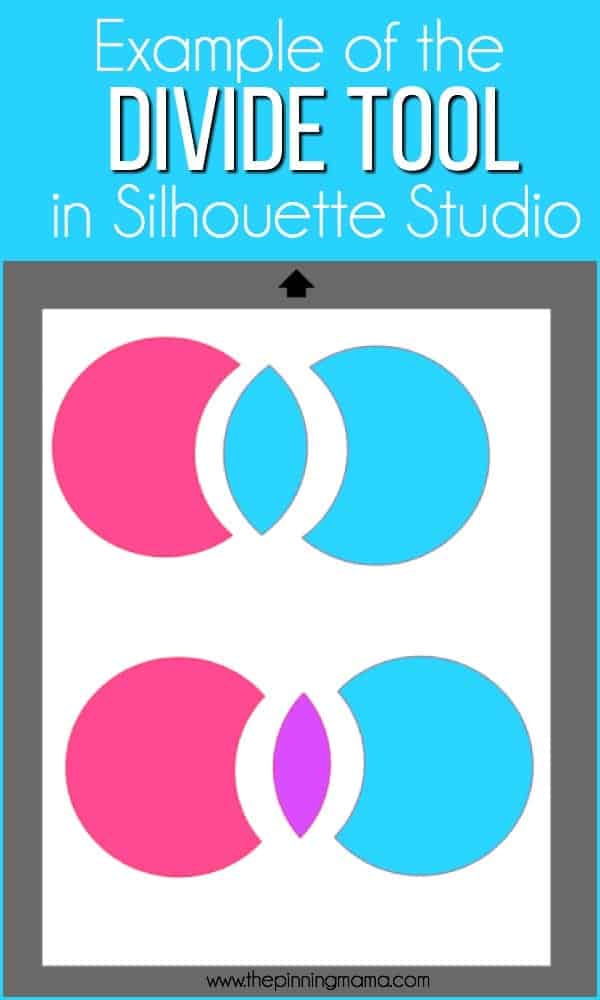
How do I use the Divide Tool in Silhouette Studio?
- Open up two or more shapes. Up to eight shapes can be divided concurrently.
- Move the shapes so that they overlap in one or more places.
- Select all
- Overlapping designs by clicking one, then holding shift and clicking the other(s) (you will know they are selected if they have a light box around the shape)
- Open the Modify window in the top right tool bar and then click Divide in the menu options.
Example of using the Divide Tool
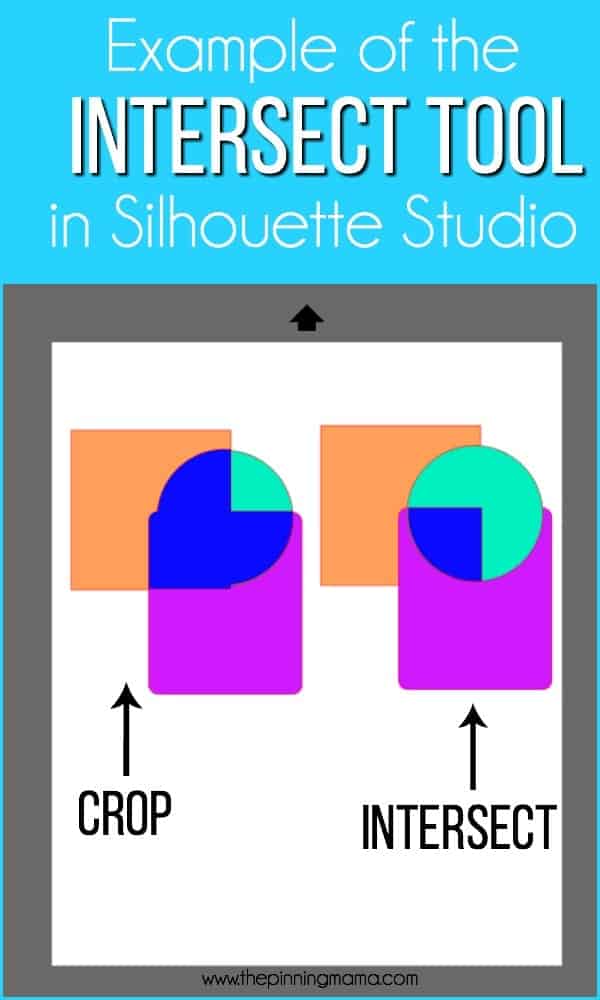
How do I use the Intersect Tool in Silhouette Studio?
- Open up up two or more shapes.
- Move the shapes so that they overlap in one or more places.
- Select all overlapping designs by clicking one, then holding shift and clicking the other(s) (you will know they are selected if they have a light box around the shape)
- Open the Modify window in the right tool bar and then click Intersect in the menu options.
Example of using the Intersect Tool
How do I use the Subtract Tool in Silhouette Studio?
- Open up up two or more shapes.
- Move the shapes so that they overlap in one or more places.
- Move the shape that you want to be removed to the front. IMPORTANT: Only move the shape you want to remove forward, do not move all shapes forward.
- Select all overlapping designs by clicking one, then holding shift and clicking the other(s), or by using the select tool to draw a box around all of them. (you will know they are selected if they have a light box around the shape)
- Open the Modify window in the right tool bar and then click Subtract in the menu options.
Example of using the Subtract Tool
How do I use the Subtract All Tool in Silhouette Studio?
- Open up up two or more shapes.
- Move the shapes so that they overlap in one or more places.
- Move the shape that you want to stay complete to the front. This shape will subtract from the ones behind it, but the shape itself will stay in tact.
- Select all overlapping designs by clicking one, then holding shift and clicking the other(s), or by using the select tool to draw a box around all of them. (you will know they are selected if they have a light box around the shape)
- Open the Modify window in the top right tool bar and then click Subtract All in the menu options.
Example of using the Subtract All Tool
How do I use the Weld Feature in Silhouette Studio?
- Open up to two or more shapes or write in a script font.
- Move the shapes so that they overlap in one or more places. Note: If you are writing with a font, you can use the character spacing slider in the text panel to make sure the characters are overlapping just perfectly to weld.
- Select all overlapping designs by clicking one, then holding shift and clicking the other(s), or using the select tool to draw a box around the shapes/text. (You will know they are selected if they have a light box around the shape)
- Right click and choose weld from the menu.
Example of using the Weld Feature
That’s it for today’s lesson. I hope this review of the Modify Panel helps you in your journey to designing something fun. It was nice for me to go back and review each of these functions as well. I have linked all of them for you so if you need to go back and review the posts it’s suer easy.
Stay tuned for next weeks lesson……. What is Scale/Shear in Silhouette Studio? I can’t wait to tell all of you about it.


Leave a Comment