Hey Everyone, welcome back to my series The Beginners Guide to Vinyl. We are moving right along. Last week we learned all about Where to Buy Vinyl. This week we are going to learn all about how to cut vinyl with your Silhouette CAMEO. This is a beginner level series but may have some tidbits of knowledge that are helpful for all levels of crafters!
Welcome to our NEWEST series for crafting with your Silhouette CAMEO. This series is all about Adhesive Vinyl. We will cover everything from what it is, to where to get it and how to cut it over the next few weeks.
This post will be your index and keep links to all of the posts for this series as they go live. So first, make sure to do a couple of things to keep up with the series and all of the great information!
- Sign up for our e-mail list! By signing up to get e-mails from us, you will get a notification in your inbox any time that a new Silhouette post is up and ready for you to read. We don’t send spam or anything else, just info on new Silhouette and crafting stuff! To sign up, click here!
- Pin this post! If you have Pinterest, I am going to ask you to pin this for 2 reasons. First, it will help you find this post to come back and reference it for new posts or to help on projects. Second, it helps support my site by spreading the word about the series so that we can bring you even more of these Silhouette series!
- Know the Basics! If you are new to Silhouette or need more information on using your Silhouette machine in general, make sure and check out our Silhouette Boot Camp where we walk through all the basics of the machine!
How to Cut Vinyl
When you are new to using vinyl, cutting your vinyl can be a bit intimidating. Especially when you only have enough vinyl for the project your are working on. I will walk you step by step so you can become as comfortable as I am cutting vinyl. So lets get started on learning to cut!
The basic steps will look like this, and I will walk you through each one.
- Page Settings
- Design
- Cut Settings
- Test Cut
- Cut Project
Page Settings
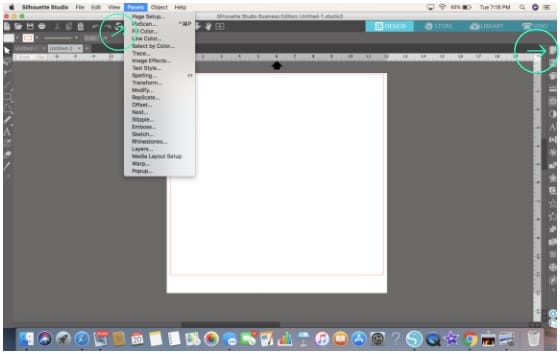
When you are starting a project you need to set up the page you will be working on to match what you want to cut. To access the Page menu, click the white paper and the right of your Silhouette design screen. You can also click the panels tab at the top of your screen and select Page Setup.
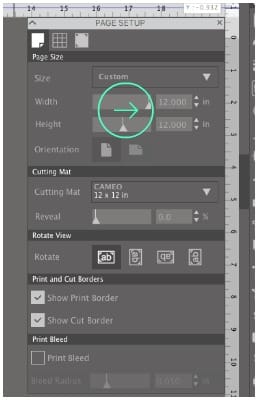
Once you get the screen up on the right hand side, you need to set up your page. Here is an example of what you need to have selected.
Width and Height:
You want to set this part up to match the height and width of your vinyl. Most pieces of vinyl 12x 12. That would mean your vinyl is 12 inches wide and 12 inches in height. Another example would be if you are cutting vinyl for a larger project and you are using a roll that is 12 inches wide by 8 feet long, you would set your machine to 12 incessantly width and 96 inches in height. You could also cut down your roll, but I like to leave a little excess so my machine doesn’t over cut my design. I don’t like to precut my vinyl, I just cut off the excess when I am done. Doing this helps you save more of the leftover vinyl, and you can use that roll again.
Rotate View:
This just simply refers to how you are looking at your project. I just leave my view on the default view, which shows me loading my vinyl at the top end of the screen. You can switch it to an alternative view but it makes most sense to leave it as is.
Cutting Mat:
This is one of the most important settings in cutting vinyl! When you start to cut vinyl you either choose to cut it with or without a mat. Each work and are both great options. But you need to make sure you match the cutting to mat in your options so it shows with or without a mat.
- Cutting with a mat- This option tends to be a bit easier for most. It allows you to cut 12×12 if using a standard mat or 12×24 if using a larger mat. The benefits of using a mat are….. easier to load, less chance of slipping of vinyl, and smaller cut borders. Another great thing is you can place multiple pieces of vinyl on one mat when cutting your design. This is great when your design uses multiple colors.
- Cutting without a mat- This option is great because you can cut smaller pieces of vinyl without a mat. The backing of the vinyl allows your Silhouette to grip it when printing. I love this option because you can use long rolls of vinyl and cut multiple projects at once.
Now you are ready to design!!!
Design
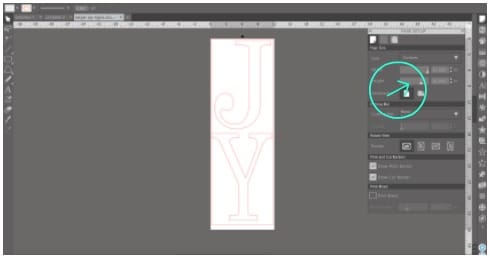
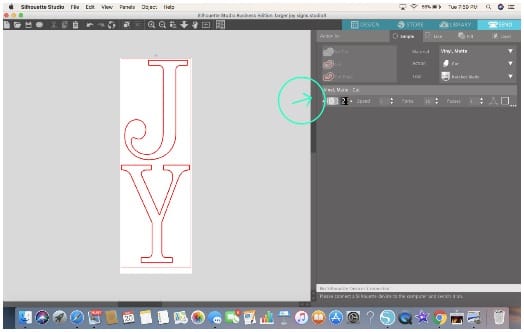
This is where the fun starts, creating your design in Silhouette Studio. This takes a little bit of work but once you are done with your design you will feel accomplished and ready to cut. A few things to consider when designing your project. How big is your project? Do you need to make your design wider or longer? If you are using a 12×12 piece of vinyl, you want to make sure your design fits in this space. If not you need a different piece of vinyl. The Silhouette CAMEO will cut 12 inches by 10 feet. A few examples of projects that need a little large vinyl would be a wall decal above the bed or vinyl for a wooden sign for your wall or front porch. The example below are stencils I am cutting for a wooden JOY sign for my wall.
If this is your first project, I recommend not picking anything too big or too small to start with. Cutting a design that is over 3 inches total and under 12 inches will be the easiest to learn on as a rule of thumb. Also, designs and fonts that use bolder lines instead of thin and intricate detail are going to be the simplest to cut, weed, and apply.
To start, open Silhouette Studio on your computer. You can then open a design from your library, create your own design. Silhouette design store offers a wide variety of designs and fonts too.
Once your cut file is open, you can resize it to fit on your project. I usually follow this workflow:
- Measure item vinyl will be applied to for an approximate size
- Open or create design in Silhouette Studio
- Resize to fit my project
Now that you have your design to the right size for your vinyl, now it’s time to cut.
Cut Settings
My next post will be all about using cut settings so I will touch on this briefly but explain it in detail next week. Cut settings can be the easiest and the trickiest part of getting a great cut! The good news is that there are some great cut setting recommendations to give you a great starting point for getting a perfect cut. The trickier news is that each machine, vinyl sheet, and even blade can cut slightly differently, so you will need to test cut for each new material or time that you changeto a new blade to make sure that the settings make the perfect cut and you can avoid wasting expensive materials.
Once you have your cut settings selected correctly, now is the time to perform a test cut.
Test Cut
Now that you have your cut settings set to a smart starting point we will do a test cut to see how the vinyl will cut. It is always tempting to want to skip this step and just get right to the cutting, but you will save yourself so much time and material by test cutting! You don’t have to do it for every cut, but I recommend it anytime you:
• Cut a new material
• Switch to a new blade
• Use a different machine
• Switch to a new cutting mat
I have forgotten to do a test cut and I have wasted a lot of vinyl by doing this. Just remember to always TEST CUT!
The test cut option is located in the send tab of Silhouette Studio. It is at the bottom of the page, right above the word send. Once the material is loaded, bring up the cut settings panel and make sure that your material is selected and the cut settings are where you want them, then scroll to the bottom of the panel and hit the Test Cut button to send the test cut to the Silhouette.
Once the cut has finished, use the button on the front of your machine to unload the project. Once you have the vinyl out, check the cut. What you are looking for is:
•Cut cleanly through vinyl
•Is not cut through backing paper
•Triangle and rectangle can both be removed cleanly without any places that stick or pull from not being fully cut.
If the test cut comes out perfect then move on to the cut. If not then adjust your settings and then repeat the test cut process.
I will explain test cuts in a little more detail next week in my cut settings post.
Cut Project
It is time to cut your design!! You can finally reap the benefits of all your hard work thus far.
The auto blade is designed to make cutting easier by automatically adjusting your blade to the perfect settings for each material. The Automatic Blade can only be used in the tool 1 spot of a CAMEO 3. It cannot be used with any of the earlier versions of the machine.
Now you can send your design to be cut. This is located in the Send Tab in Silhouette Studio at the bottom of the page. The machine will adjust your blade using a series of taps and start to cut. After your design is done cutting, touch the unload button on your Silhouette CAMEO.
WOW!!! That was a lot of instructions but I hope you found it helpful. Tune in next week to learn all about Cut Settings in Silhouette Studio.


Kathy M says
Great tutorial! I’m new to Silhouette and vinyl. Can you answer a question? I’d like to cut a ‘Merry Christmas’ design in vinyl. Do I chose the Studio or SVG file type in the Design Store?
Kimber says
You will want to choose the studio file type for the easiest cut! SVG can be used if you have the higher level of software also, but the studio file will be ready to go.