Hello everyone, thanks for joining me for on The Beginners Guide to Vinyl. We are really making progress and learning al about cutting vinyl. This week we are learning all about cut settings for your Silhouette CAMEO. Last week we learned all about How to cut vinyl with your Silhouette CAMEO. This is a beginner level series but may have some tidbits of knowledge that are helpful for all levels of crafters!
Welcome to our NEWEST series for crafting with your Silhouette CAMEO. This series is all about Adhesive Vinyl. We will cover everything from what it is, to where to get it and how to cut it over the next few weeks.
This post will be your index and keep links to all of the posts for this series as they go live. So first, make sure to do a couple of things to keep up with the series and all of the great information!
- Sign up for our e-mail list! By signing up to get e-mails from us, you will get a notification in your inbox any time that a new Silhouette post is up and ready for you to read. We don’t send spam or anything else, just info on new Silhouette and crafting stuff! To sign up, click here!
- Pin this post! If you have Pinterest, I am going to ask you to pin this for 2 reasons. First, it will help you find this post to come back and reference it for new posts or to help on projects. Second, it helps support my site by spreading the word about the series so that we can bring you even more of these Silhouette series!
- Know the Basics! If you are new to Silhouette or need more information on using your Silhouette machine in general, make sure and check out our Silhouette Boot Camp where we walk through all the basics of the machine!
Cut Settings
Cut Settings can be easiest and trickiest of getting great cut. The tricky news is that each piece of vinyl, blade and machine can cut a little differently. You need to make sure you text cut every time you change vinyl, to avoid wasting materials.
You can access the cut settings by clicking on the send tab in Silhouette Studio. Once you have arrived at the send tab, this is where you can change your settings.
Action- Choose cut
Material- Choose type of material closest to the vinyl you will be using. This will get you to a good starting point. Vinyl (Silhouette Brand) – I choose this for regular vinyl including 631, 651, Silhouette Brand, and Cricut Brand, glitter, patterned, and other similar. Glow in the Dark Vinyl- Use for glow in the dark vinyl
Blade- Ratchet Blade
Adjusting Cut Settings
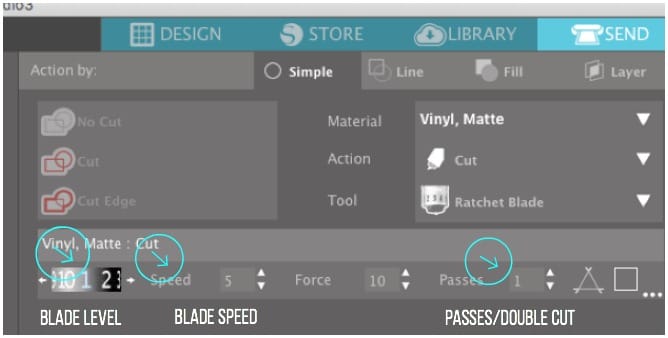
When you start cutting, select the default material that is closest to the material you are using. This is a really great place to start. There are times though, that it might cut too deep, cutting through the paper behind the vinyl, or too shallow, not cutting all the way through the material in some or all places. Understanding the cut settings can help you know what to do when the cut isn’t just right, so you can fix it quickly and be back on track with a perfect cut.
- Blade Level– The blade level is so how far the blade is exposed. This allows the blade to adjust to different levels depending on the thickness of the material. The auto blade will automatically adjust itself to the thickness you have set in the software.
- Blade Speed– The speed of the blade is generally one of the most forgiving settings in the cut panel. This setting is fairly straight forward as it indicates the speed at which the project is cut. Most projects can cut easily at the default setting. While cutting quickly is nice, if you find that you have issues with intricate details or corners cutting perfectly, or you have places where the vinyl (or other material) pulls up, slowing down the speed of the cut can help to fix these problems.
- Double Cut/Passes– This feature will cut the material once, and return and cut it again. Double cut is useful if there are any problems in your first cut. A second time through will ensure that everything is cut cleanly. This is not a needed thing to do each time, but it is useful when using denser or thicker material, or designs with a lot of detail.
Test Cut
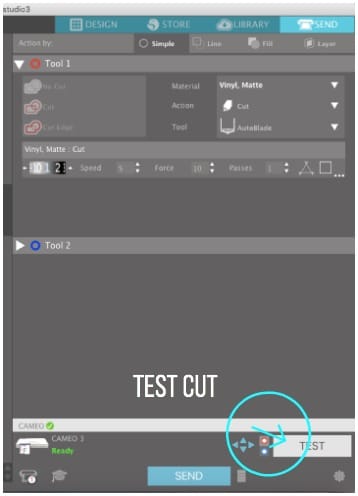
Now that you have your cut settings set to a smart starting point we will do a test cut to see how the vinyl will cut. It is always tempting to want to skip this step and just get right to the cutting, but you will save yourself so much time and material by test cutting! You don’t have to do it for every cut, but I recommend it anytime you:
• Cut a new material
• Switch to a new blade
• Use a different machine
• Switch to a new cutting mat
Once the material is loaded Go to the Send tab in Silhouette, then scroll to the bottom of the page to Test Cut. Once the cut is finished, use the unload button on your machine to unload your vinyl. Once the vinyl is removed, look at your test cut. Did it cut cleanly through the vinyl? Did the machine cut all the way through to the back?? If this happened, the blade is cutting too deep. Can the triangle be removed completely without any places sticking.
This may seem like an annoying step, but this will save you time, money and wasted materials. Once you figure out what works for your machine and the material you are using, it generally changes very little over time so it is definitely worth the initial investment of time in getting that test cut just right!
I hope this clears up any questions you have regarding cut settings. Once you get your cut settings just right, cutting your project will be a breeze. Tune in next week to learn all about How to Load Vinyl in your Silhouette CAMEO.


Leave a Comment