Hey Everyone, we are almost done with our bootcamp series…. we only have a few short lessons left. I have loved helping all of you out and learning for myself along the way. Last week we learned all about the different features in the Transform Panel in Silhouette Studio. This week we are learning all about using the Print and Cut feature from start to finish. Silhouette Boot Camp is filled with mini lessons that help us learn the terminology used in the Silhouette Studio software so that we can cut any design we can dream up with ease!
Before we get started, there are a couple of things to help you get the most of the experience:
- If you are new here, take a look the Silhouette Boot Camp Welcome with all courses listed and catch up on any you missed.
- Sign up for my Silhouette Newsletter which will email you when the lessons are released each week. {click HERE to sign up!}
- Pin this post! Each of these lessons takes me on average, 8-12 hours to create for you. I can do these lessons for FREE thanks to your support in coming to my site, reading the tutorials and sharing it with your friends. By pinning this post or sharing it on Facebook with your Silhouette friends, it helps you know where to find it if you need to reference it again, and it helps me spread the word so that I can keep the resources and freebies FREE to you!
What does Print and Cut mean in Silhouette Studio?
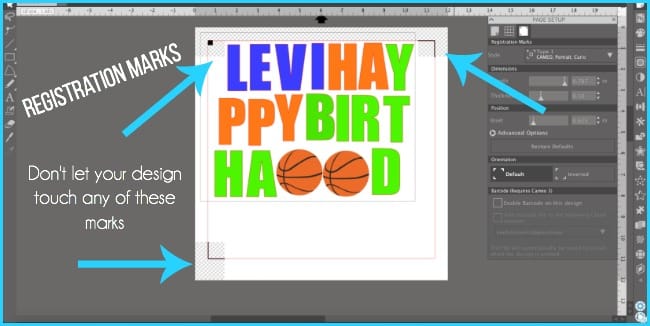
As defined in Silhouette Studio Print and Cut is a a feature where you can create a design in Silhouette Studio, send it to your printer, then use your printed design from your printer in your Silhouette CAMEO to be cut. Your Silhouette CAMEO uses special marks called registration marks to read your design and cut it out correctly along the lines on your design. A few weeks about I wrote a post on how to use Registration Marks for Print and Cut, I will link it here for you if you have any questions on how to use them.
How do I use the Print and Cut feature?
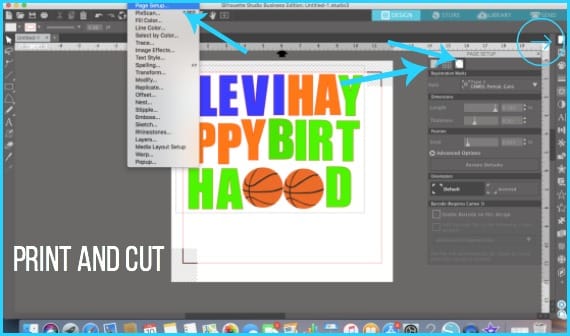
To use the Print and Cut feature …. first open up Page Set Up and select the appropriate page size for your design. Make sure the page size you have selected is what size paper you have ready in your printer. Then select Print and Cut lines to be turned on. Next click on the Registration marks tab in the Page Set Up panel and turn on your registration marks. Double check your design to make sure that no parts of it are touching the marks. Now you are ready to print. Send the design to your printer. After your design is printed, next is the fun part… watching your Silhouette CAMEO do it’s magic as it cuts your printed design. Make sure you place the design with the arrows pointing toward your silhouette or the Registration Marks at the top. Make sure you have correctly checked for mat or not mat. Once you are ready to start cutting, hit send.
Your CAMEO will read the registration marks and cut your design out that you have printed.
Where do I find Print and Cut in Silhouette Studio?
You can access the Print and Cut feature in a few different locations.
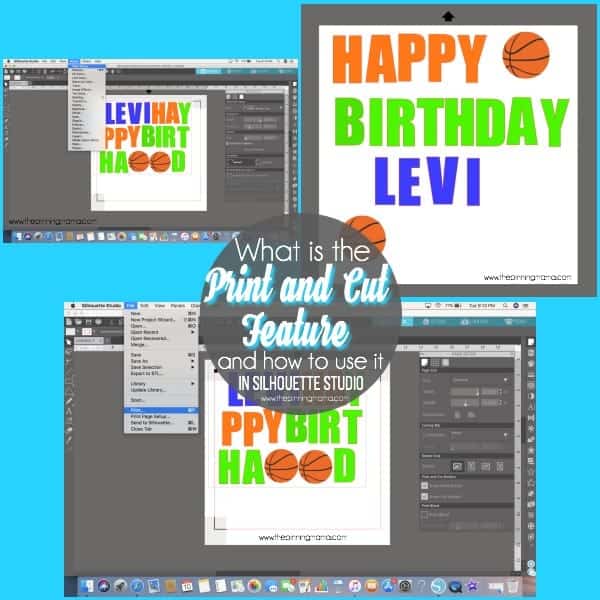
- Right hand side of the screen, Page Set Up Icon (white paper), click on it and your will find your page set up. After you select the appropriate size and turn on your registration marks, then select file at the top, and print.
- In the top menu, click Panels, select Page set up, Turn on your registration marks, then click File in the top menu and print.
Example of using the Print and Cut feature:
I’m making a banner for my little guys birthday. He’s been really into sports so we went with basketballs to be used at both ends. I used the Print and Cut feature to make a banner for his birthday. I bought the basketball design off the silhouette design store. I will walk you through the steps of designing his banner to printing it and sending it to the Silhouette to be cut.
When to use Print and Cut:
Print and Cut is used for a wide variety of things and once you get comfortable with it I promise you will use it all the time. Print and Cut is great for making stickers, banners, cupcake toppers, homemade cards and much much more.
Special Notes on using the Print and Cut feature:
Make sure you have checked your Page Set Up settings before you print. You also want to make sure none of your design is touching the registration marks. Lastly make sure you have the print lines and the cut lines checked so you can see what if your design is in the lines for your printer to print without ruining your design. After many many mistakes I try to always check this before I send it to my printer.
That’s all I have for you this week. I hope you now feel comfortable to try out the Print and Cut feature in Silhouette Studio. Tune in next week to learn all about the Stipple panel.


Leave a Comment