Learn when, where, and how to use the Group/Ungroup and Make/Release Compound Path Functions in Silhouette Studio. We are going through what they are and how to use them to make any design you can dream up with your Silhouette CAMEO!
Congratulations! You made it to Lesson 2 in the Silhouette Boot Camp. In lesson 1 we talked all about file types you can use in Silhouette Studio, and now that we know our files {see Silhouette Studio Compatible File Types here} we are going to start talking about the designs themselves and how to customize and cut them using Silhouette Studio.
Before we get started, there are a couple of things to help you get the most of the experience:
- If you are new here, take a look the Silhouette Boot Camp Welcome with all courses listed and catch up on any you missed.
- Sign up for my Silhouette Newsletter which will email you when the lessons are released each week.
—–>Click here to SIGN UP!!! <—— - Pin this post! Each of these lessons takes me on average, 8-12 hours to create for you. I can do these lessons for FREE thanks to your support in coming to my site. By pinning this post or sharing it on Facebook with your Silhouette friends, it helps me spread the word so that I can keep the resources and freebies FREE to you! {See my Silhouette Free Cut Files here!}
Today’s lesson is all about how shapes work together. If you don’t have a background in design, the terms grouping and making and releasing compound paths are most likely a foreign language to you like they were to me! This lesson is going to be a tad longer than most just so I can make sure that you have a great grasp on what we are learning today since it is a foundation for how so many things work in the Silhouette Studio Software. So hang in there and let’s learn all about this function I use multiple times each time I am in Silhouette Studio.
When you open Silhouette Studio you will be hoping to cut a design. All designs are made up of different shapes and lines that combine to make a whole design. Sometimes though you might want to add or take away something from the design or you want to change the size or scale of the design. Understanding grouping and compound paths can help you really learn how to use the Silhouette software to design on a bigger and better scale.
Read the explanations below, and most of all… watch the video. Compound paths can be a harder concept to grasp so I think the video helps to really make things come together. And as always… if you have questions, leave them in the comments!
What Does Group and Ungroup Mean in Silhouette Studio?
To group is to take every single line of a design and group it together to be moved or transformed as one whole unit.
How do I Group and Ungroup?
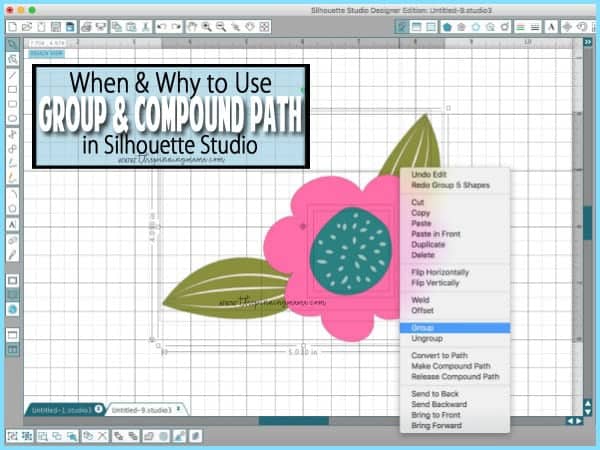
To group objects, select every single small piece, by either using Select (the arrow icon in the top left bar) to drag a box around the objects, or click on each object while holding shift, then right click and select the option to group together as one.
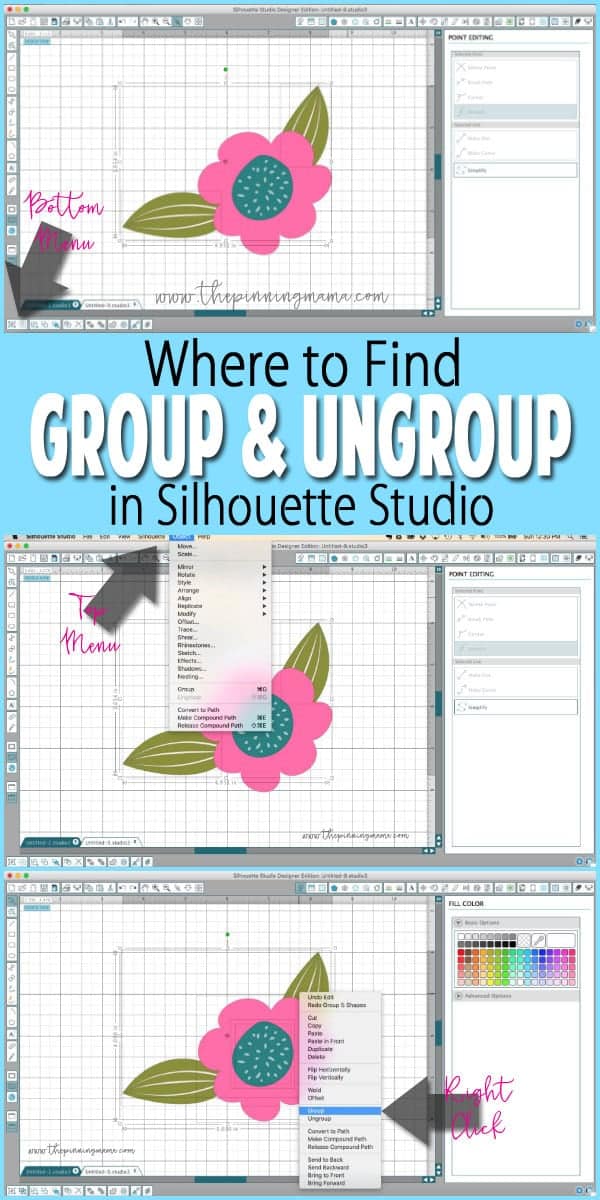
Where to Find Group/Ungroup in Silhouette Studio:
You can find the group or ungroup command in a few simple places in Silhouette Studio. Once the items you want to Group or Ungroup are selected then click the command:
- In the bottom left icon menu
- Right click and choose from the menu
- In the very top pull down menus choose Object –> Group or Object –> Ungroup
- Use the keyboard shortcut
- Group: Cmd+G (mac) or Ctrl+G (PC)
- Ungroup:Cmd+U (mac) or Ctrl+U (PC)
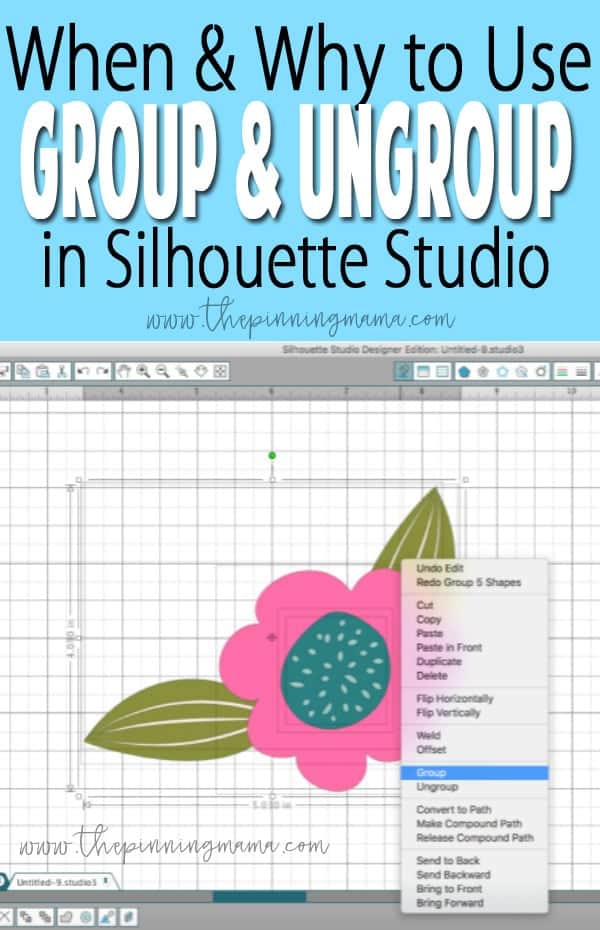
Example of Grouping and Ungrouping:
This is useful when you want to increase/decrease the size of multiple objects at the exact same scale or move them together as one unit.
Special Notes on Grouping and Ungrouping:
When grouping your objects, you will need to make sure that they are all selected which can be tricky if you have many objects, especially ones that are small and internal to your design. You will know your objects are selected by the very light square outline around each one that has been selected. If the outline disappears, it is now no longer selected.
What is a Compound Path in Silhouette Studio?
A compound path is similar to grouping but with a compound path the inner lines are embedded into the design allowing a design to be filled with color properly. Especially useful when doing a print and cut or making mock-ups for customers.
As defined by Silhouette:
Compound paths are a collection of two or more line sets where inner lines are embedded into the image. A compound path may appear the same as a grouped set of lines, but is quite different in the way it will react to being filled with color, for example.
How do I Make or Release a Compound Path?
You can “make a compound” or “release the compound” by selecting the shapes you want to effect, then either:
- Right click on the shapes and clicking the Make Compound Path or Release Compound Path in the drop down menu.
- Choosing Make or Release under Compound Paths in the Modify Panel.
- In the very top pull down menus choose Object –> Make Compound Path or Object –> Release Compound Path
- Use the keyboard shortcut
- Make Compound Path: Cmd+E (mac) or Ctrl+E (PC)
- Release Compound Path: Shift+Cmd+E (mac) or Shift+Ctrl+U (PC)
Example of a Compound Path:
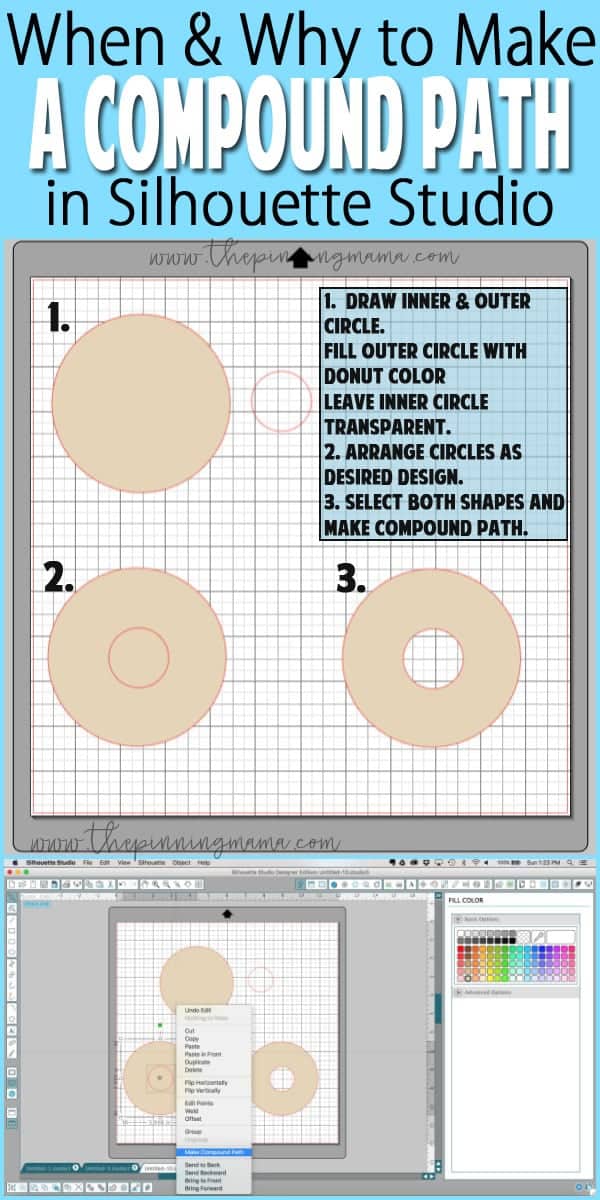
This can seem a little confusing without a visual so think about this simple example. Think of a donut. A donut shape is a circle with a hole in the middle. Really this is 2 separate shapes combined to make one shape, a larger outer circle and a smaller transparent inner circle to create the hole in the donut. If you are trying to make a donut though, you don’t want two separate shapes, you want one shape that you can color and manipulate the size. If you draw the two circles and place them where you want to make a donut shape, then convert it to a compound path, it will allow you to manipulate the entire donut shape together.
This is different than just grouping the shape because of the way it fills with color. If you draw your first larger circle filled with red, then draw your second circle in the middle transparent, since you want to see through the middle of a donut, then by default you will see a large red circle and the cut line for the smaller circle but since it is transparent it will show the red circle behind it. If you were to group the two circles they would move or transform as one shape, but you still wouldn’t achieve the transparent middle. However, if you select both the inner and outer circles, right click, and “Make Compound Path,” then the software will understand that you want this to be seen as one more complex shape and not only will the shape move and transform together as if you grouped two shapes, but since it is converted to one shape, it will show the center circle as transparent and the space between the outer circle and inner circle as red, per this example.
When to Make or Release a Compound Path
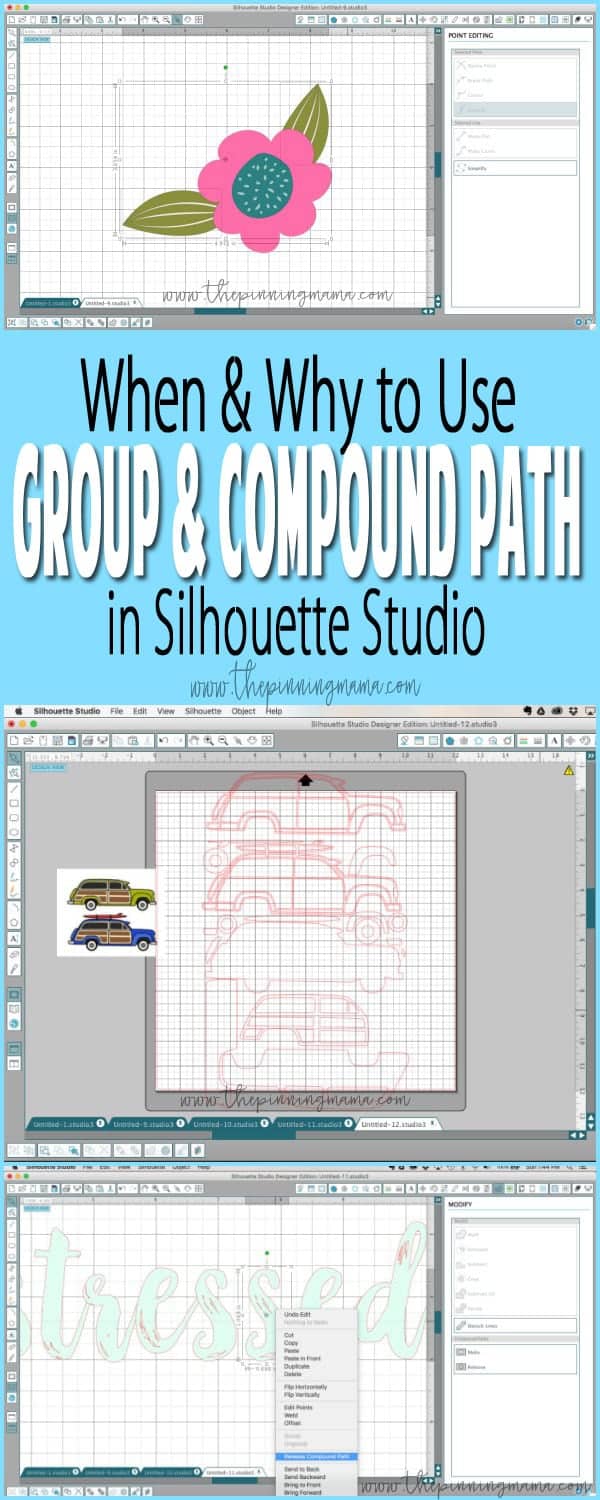
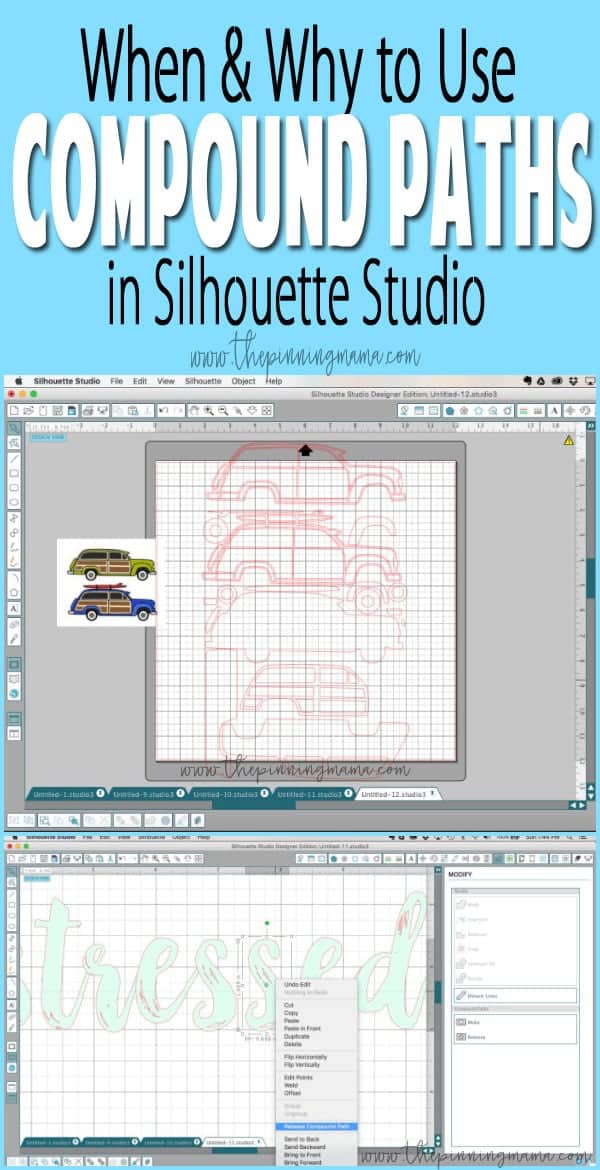
Now that you understand what a compound path is, the way that I most often use it in Silhouette Studio, is not by making compound paths, but actually releasing them! If you are trying to modify a file that you have but it is not allowing you to edit it the way you want, for example, deleting a dot on the design or making one line on the design larger or smaller without the rest of it, you can right click the design, make sure that it is ungrouped, then release the compound path, and it gives you the ability to edit all of the lines, and aspects of the design individually instead of it acting as one piece.
The example above shows two examples of when I release compound paths to help me design. The top example is a Woody Car from the Silhouette Design Store. When you get the file and open it, you will see this. After you ungroup it, all of the car pieces are now individual, but say I wanted to change the windows on the piece second from the bottom to make them look more like my car. I would need to click on the design to select that piece, then right click and you can see that ungroup is no longer an option, because it is actually a compound path, so I choose release compound path and then I can work with each window piece individually.
I also do this a lot with fonts that have distressing by releasing the compound path and deleting the “distressing” or dots inside the letters that don’t cut well, or more complex designs that I want to remove or change just one small element. You can see in the bottom example above that the font I chose has distressing in it that will not cut well, so I can first ungroup the word into individual letters, then release the compound path which will give me the ability to delete the small distressing marks inside the letter.


Dawn Brantley says
Your tutorials are much more educational than the ones I paid for. Thank you so much!
Patricia Minter says
I just found your blog. Really interested in all lessons. Just finished Boot Camp Lesson 1 and Lesson . how do you get a good print out ?
Janet Asbury says
AHAH! Thanx so much for clarifying that. I use them both and get so confused when tho use what!
Lindy says
Awesome explanation! Thanks!
Amanda says
Thank you for explaining that with such clarity!
Robin V says
I finally understand this part of the lesson but I am having difficulty figuring out how to just cut the outer edge of the circle and not the inner circle when I have made a compound path with a design such as you have with the donut; but just want to cut the outer edge. I have tried everything but I am sure it is a simple step I am missing. I want to use if for print and cut but just that dang outer circle. Seems once the compound path is made there is no way to release the cut line on the inner circle? thanks so much in advance.
Maryann says
Thank you! I was very easy to understand and helpful. ?
liz Scott says
Thank you for such a easy tutorial to understand. I can’t wait to try it.
Liz S.
Samantha says
This was extremely helpful – especially the video!
Kelly says
Pleasee help me !! I bought a svg image it’s a leopard print Minnie mouse head with solid black bow on it.. I am trying to un group the image so the bow prints right & rounded edge on the part that overlaps.. I can not get it to work.. ungroup isn’t an option.. I tried u do the compound image and it’s not separating the image out.. I know it’s user error but I can’t figure it out., I am working on a Mac… I am just trying to make a mommy mouse tee shirt for my 3year old and struggling any help I greatly appreciate